In StaffingGo, all reimbursements processed for employees must be linked to predefined Reimbursement Headers. This ensures accurate payroll processing, reporting, and compliance. The headers act as master records that define how each type of reimbursement (e.g., Travel Allowance, Food Coupons, Medical Reimbursement, etc.) should be calculated and reported.
To enable reimbursements for employees under a specific contract, the corresponding Reimbursement Headers must be configured at the contract level.
Step 1: Configure Reimbursement Salary / Claims Header
Navigate to the Salary Header Configuration section in the application.
Create the Reimbursement Header, While configuring the header, always enable the mark as not part of salary structure option. Ex : Example: Travel Reimbursement, Internet Bill Reimbursement, etc.
This step is mandatory ( Highlighted in screenshot under salary header creation ), as the system only considers headers with this option enabled for reimbursement mapping. If skipped, the header will not appear while mapping at the contract level.
If the same reimbursements are applicable for the billing to the client , set up the billing type & mark up configuration on the same.


Step 2: Map Reimbursement Header under required client - contract level.
Once the headers are created and saved, User need to be linked under each applicable contract:
Navigate to selected client Contracts in the application ,Specific Contract where reimbursements component need to implement.
In contract profile >> Navigate to the Salary/Reimbursement option. Click on + symbol to map the reimbursement header.

From the dropdown, choose the required Reimbursement Header and enable additional configuration if required and save .

All PF, ESI & LWF applicability will fetch from the configuration which has been done in the salary header master level. If any changes required use the salary override to enable and disable the configuration.
Define the markup in terms of percentage/flat on the selected component.
Max Limit :Specifies the maximum amount that can be reimbursed for this component, if applicable.
Default Value: 0 (No upper limit set)
Purpose: Controls the upper cap for reimbursement claims by the employee.Set up the limit type in the ESS portal to restrict the employee claims with in the limit.
Per Entry (Limit applies per claim entry)
Monthly (Limit applies per month)
Day(Limit applies day)
Is Proof is Mandatory - Enable if the proof collection is mandatory in ESS portal. Based on this configuration in ESS portal supportive documents will connect.
Allow to raise claims from ESS portal - All reimbursement components should enable with configuration. Same enabled component only will reflect in the ESS portal to cliam.
Consider for Min. exemption Units- Specifies the minimum units to be considered for tax exemption calculation and enable with is consider Min exemption option allow the process.
Rate Per Unit - For rate per day reimbursement claims, defined Rate per unit will consider.
Slab is Rate Per Unit - Enable this functionality for the the conveyance claims with define the slab limits.
Process reimbursement through E&D once it is approved-Enable this option, if the approved claims need to process along with payroll.
Value Round : Configured mark up computed amount will get round based on the configuration
NA (No rounding)
Round Off
Round Up
Round Down
Purpose: Ensures consistency in rounding off reimbursement amounts during processing.
Step 3: Approval Matrix Configuration :
- Employee raised reimbursement claims will follow with approval process for this configured the approval matrix in specific client if approval matrix is differ , If same set up under master level.
- For Master Level configuration - Navigate to setting >> Company set up >> Portal Setting >> Approval Setting >> Choose the approval type as reimbursement & map the approver. We can able to set up the multiple levels of approver.

3. For similar way client level also we do have approval configuration . Navigate to selected client >> Setting >> Approval Setting .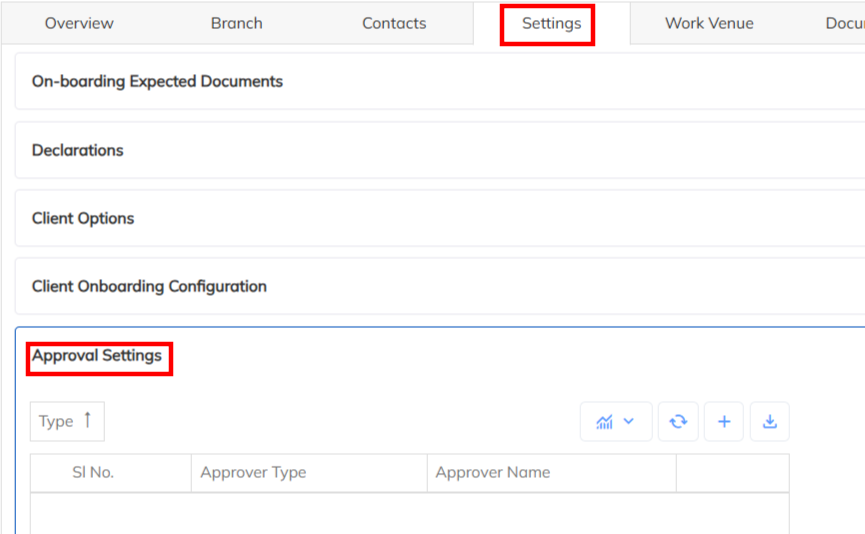
Step 4 : Enable Reimbursement option in ESS portal .
- Navigate to setting >> Company set up >> Portal Setting >> Self Service >> enable the Allow employee travel & reimbursement. Once enable this option in ESS portal under financial can get reimbursement claim option.

Step 5: Mailer Configuration
Follow the below mentioned steps to configure the mailer as per the client customization. Default mailer will triggers from the application.
1. Navigate to Setting >>General Master >> System Mailer . In this mailer mentioned tags are usable for data replace & use the CC & Bcc for more notification to internal team.

Reimbursement Candidate Mailer
- Purpose: Notifies the candidate when a reimbursement request has been successfully submitted.
- Content: Includes details of the claim (expense type, amount, submission date, and status).
- Recipient: Candidate/employee who raised the reimbursement request.
Reimbursement Approval Mailer
- Purpose: Alerts the approver (such as Reporting Manager or HR) when a candidate submits a reimbursement request.
- Content: Displays the request details with request more information.
- Recipient: Approving authority defined in the workflow.
Reimbursement Action Approval Mailer
- Purpose: Communicates the outcome of the reimbursement approval/ Rejection process.
- Content: Confirms whether the reimbursement request is Approve ,Rejected & view option includes for further process to approver.
- Recipient: Approver will receive the action mailer to performed the activity.
Step 6: Additional Notification to cc manager & other configuration
- Navigate the Setting >> Staffing Masters >> HR option >>Choose the REIMBURSEMENT section under selected HR option.
- Send Reimbursement Claim mails in CC to Managers - mentioned system mailer with CC Email ID will receive the reimbursement notification .
- Allow to upload Excel/Word files in ESS Reimbursement request- Enable this configuration will allow to attach the proof interns of Excel in the ESS portal.

Step 7: Reimbursement mark up computation Configuration
Claimed reimbursement can process through payroll by enabling the option process reimbursement through E&D register option under mapping the salary header in salary reimbursement option in contract level. For the same If the mark up need to compute Kindly follow the below steps to enable the configuration.
Navigate to contract module >> Select the specific client contract >> Contract options >> Payroll section >> Enable the option(Compute Reimb. Mark up in Payroll)
When this option is enabled, the system calculates and includes the reimbursement markup value (as defined in the respective reimbursement header) as part of the payroll cycle.
When Enabled:
✅ The reimbursement markup will be automatically computed and reflected in the payroll process.
✅ The computed amount will be displayed in the Earnings & Deductions (E&D) section for the respective employee.
✅ The reimbursement component will be included in the payslip and payroll register as applicable.

Was this article helpful?
That’s Great!
Thank you for your feedback
Sorry! We couldn't be helpful
Thank you for your feedback
Feedback sent
We appreciate your effort and will try to fix the article