Overview
Timesheet and Billing Templates are essential tools for managing work hours, tracking tasks, and automating billing processes. This guide provides step-by-step instructions to configure and customize these templates in the SaaS application.
1. Access the Calendar Configuration
- Log in to the SaaS application with administrator credentials.
- Navigate to the Settings menu.
- Select Staffing Template.
- Choose the calendar option to create the calendar for the year

2. Create a New Calendar Template
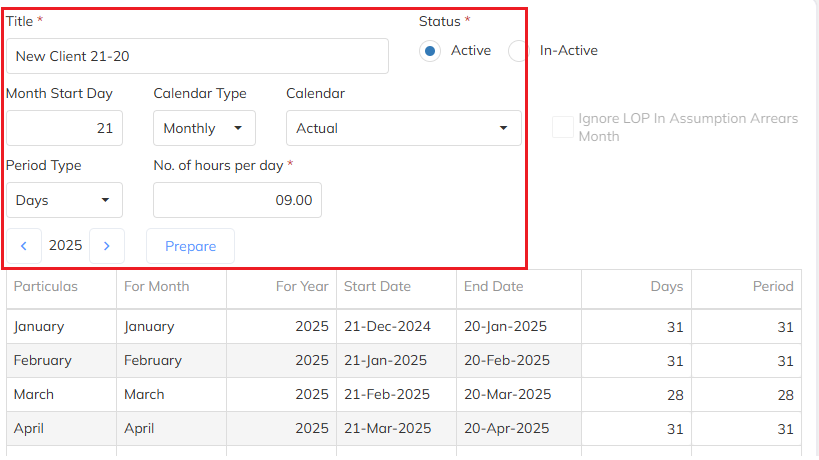
- On the calendar, click the New button and Enter the ‘title’ and update the below:
- There are two types of Calendars for creation:
- Timesheet Calendar
- A digital timesheet calendar template to track work hours or activities for both timesheet process and billing process which remains same calendar.
- Billing Calendar
- A Billing Calendar is a schedule that outlines the timeframes for only billing, invoicing, payment processing, and other financial activities. It helps businesses maintain consistency in their billing cycles, manage cash flow, and ensure timely payments.
- Timesheet Calendar
- Month start day – Timesheet commencement day
- Calendar type – Monthly/weekly and biweekly
- Period type – Days/hours
- No of hours – work hours to be served
- Calendar – Actual/user defined calendar and assumption based

- Provide the following details:
- Template Name: A unique Title name for the template (e.g., "Standard Timesheet/Billing Calendar").
- Description (optional): Briefly describe the purpose of the template (e.g., "Default timesheet for hourly employees").
3. Mapping the Calendar Template to the billing options
- To apply the template:
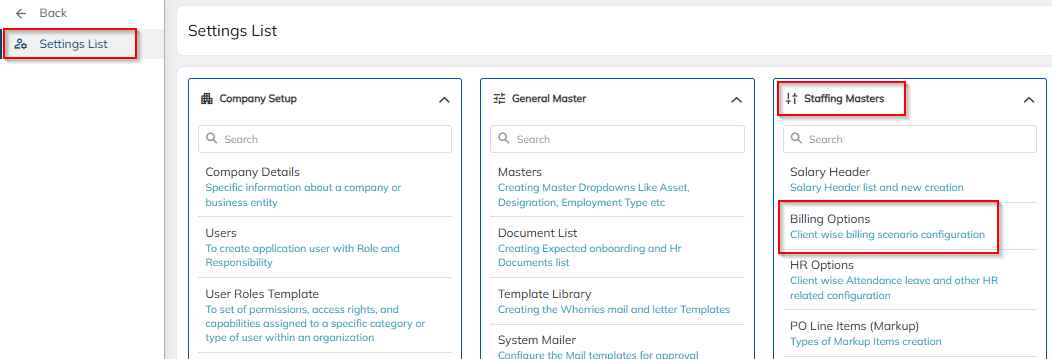
- Default created Calendar Template for Timesheet/Billing need to map under Billing Options under Staffing Master section in Setting List
- Click on Save to confirm.

- When billing option is mapped with the created Timesheet/Billing calendar template which will be set as the default Calendar template mapped to Employees

- Change Calendar template only in case of different Calendar template based on employee only if applicable under Employee Staffing details

- Billing option to be mapped while creating Client contract in application

- Click Save Template to finalize the settings.
4. Editing or Updating Templates
- Go to the respective Calendar Templates section (Timesheet or Billing).
- Only User defined Calendar Templates application will allow to update Days and period.
- Locate the template you want to edit and click the Edit icon.
- Modify the Calendar template as required.
- Click Save Changes to update the template.

5. Steps to create a new calendar year template for an existing client
- Select the existing calendar from the dropdown to generate the new calendar for the selected year

Click on the forward arrow for the new year and click on ‘prepare’ the calendar template
6. Deleting Templates
- Navigate to the respective Calendar Templates section (Timesheet or Billing).
- Select the template to delete and click the Delete icon.
Tips for Effective Configuration
- Use clear and consistent naming conventions for templates.
- Regularly review templates to ensure compliance with organizational policies and regulations.
- Communicate changes in templates to affected teams to ensure smooth implementation.
- Please contact support@staffinggo.in for any queries or concerns
Was this article helpful?
That’s Great!
Thank you for your feedback
Sorry! We couldn't be helpful
Thank you for your feedback
Feedback sent
We appreciate your effort and will try to fix the article