1. Overview
When an employee resigns during an Assumption Cycle, the employee's Last Working Date (LWD) must be validated before processing payroll.
In an Assumption Cycle, some days are automatically considered as Present for payroll. Therefore, when an employee's LWD falls before the end of the assumption period, the employee's attendance and payable days must be validated to ensure that the days after the LWD are not incorrectly considered for payroll.
Example
Timesheet Cycle: 26th May – 25th June
Payroll Month: June
Payroll Period: 1st June – 30th June
Employee LWD: 20th June
In this scenario, the employee's payable attendance should be considered only up to the applicable LWD. The assumption days after the LWD should be validated and excluded where applicable.
2. Purpose
This process is used to:
Update the employee's resignation and LWD.
Validate the employee's attendance against the LWD.
Prevent incorrect assumption days after LWD from being considered for payroll.
Process the employee's payroll correctly.
Validate the final payable days before Full & Final processing.
3. Process Flow
Update Resignation Details
↓
Enter Last Working Date
↓
Validate Employee Status
↓
Check Assumption Calendar
↓
Validate Timesheet Against LWD
↓
Correct Attendance/LOP if Required
↓
Approve Timesheet
↓
Process Payroll
↓
Validate Pay Register
↓
Process Full & Final
4. Update Employee Resignation Details
Process Details
Navigate to the Employee/HR module.
Search for the required employee.
Open the employee details.
Update the employee's Resignation/Exit details.
Enter the employee's Last Working Date (LWD).
Verify the entered LWD.
Save the details.
5. Validate Employee Status
After updating the LWD:
Open the employee's details.
Verify the employee's current employment status.
Confirm that the correct LWD is displayed.
Ensure that the LWD is before the applicable payroll end date, where applicable.
6. Validate Assumption Calendar
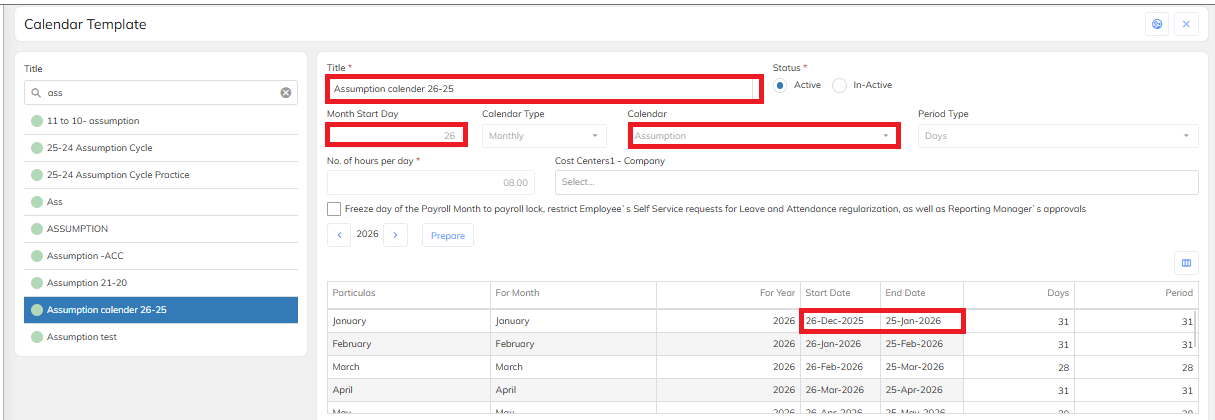
Since the employee is part of an Assumption Cycle, verify the employee's calendar before processing payroll.
Process Details
Navigate to the employee's Staffing Details.
Check the mapped Timesheet Calendar.
Verify the Assumption Cycle.
Confirm the payroll month.
Identify the assumption period falling after the employee's LWD.
Example
If:
Payroll Month = June
Timesheet Cycle = 26th May – 25th June
Payroll Period = 1st June – 30th June
LWD = 20th June
The days after 20th June must be validated before payroll processing.
7. Validate Employee Timesheet
After confirming the LWD, validate the employee's timesheet.
Process Details
Navigate to the Timesheet module.
Select the required Client.
Select the applicable payroll month.
Search for the resigned employee.
Verify attendance up to the LWD.
Check the days after the LWD.
Ensure that the employee is not incorrectly considered Present for payable payroll after the LWD.
If required, update the attendance/LOP details.
Save the changes.
8. Validate Assumption Days After LWD
This is an important validation step for resigned employees.
Process Details
Identify the assumption days after the employee's LWD.
Check whether these days have been considered as Present.
Compare the assumption days with the employee's actual LWD.
If the employee is no longer eligible for those days, correct the timesheet/payable days as applicable.
Save the changes.
Revalidate the timesheet before approval.
Example
LWD: 20th June
If the system has assumption days from 21st June to 30th June, verify that these days are not incorrectly included in the employee's payable salary.
9. Approve Timesheet
After completing the LWD validation:
Open the Timesheet Approval screen.
Search for the employee.
Verify attendance and payable days.
Confirm that the LWD is correctly considered.
Verify any LOP/adjustment details.
Approve the timesheet.
10. Process Payroll
After timesheet approval:
Navigate to the Payroll module.
Select the Client.
Select the applicable payroll month.
Load the employee.
Verify the Pay Days.
Verify the LOP/adjustment details.
Verify the LWD impact on payable days.
Process the payroll.
11. Pay Register Validation
After payroll processing, validate the employee's Pay Register.
Process Details
Navigate to Reports → Payroll → Pay Register.
Select the required Client and Payroll Month.
Generate the Pay Register.
Search for the resigned employee.
Verify:
Pay Days
LOP Days
LOP Adjustment
Earnings
Deductions
Net Pay
Confirm that days after LWD have not been incorrectly included in the payable calculation.
12. Full & Final Process
After validating the payroll:
Verify the employee's LWD.
Confirm the final payable days.
Verify salary and deduction details.
Complete the applicable Full & Final (F&F) process.
Verify the final settlement details.
Screenshot 9 – Full & Final Process
[Insert Screenshot – F&F Process Screen]
13. Final Validation Checklist
Before completing the resignation payroll process, verify:
☐ Resignation details updated
☐ LWD entered correctly
☐ Employee status validated
☐ Assumption Calendar verified
☐ Timesheet cycle verified
☐ Attendance validated up to LWD
☐ Assumption days after LWD checked
☐ Incorrect payable days corrected
☐ Timesheet approved
☐ Payroll processed
☐ Pay Register verified
☐ Net Pay validated
☐ Full & Final process completed
Expected Result
The resigned employee's payroll is processed correctly based on the applicable Last Working Date, and assumption days after the LWD are not incorrectly considered for salary calculation.
Was this article helpful?
That’s Great!
Thank you for your feedback
Sorry! We couldn't be helpful
Thank you for your feedback
Feedback sent
We appreciate your effort and will try to fix the article