1. Opening a Ticket
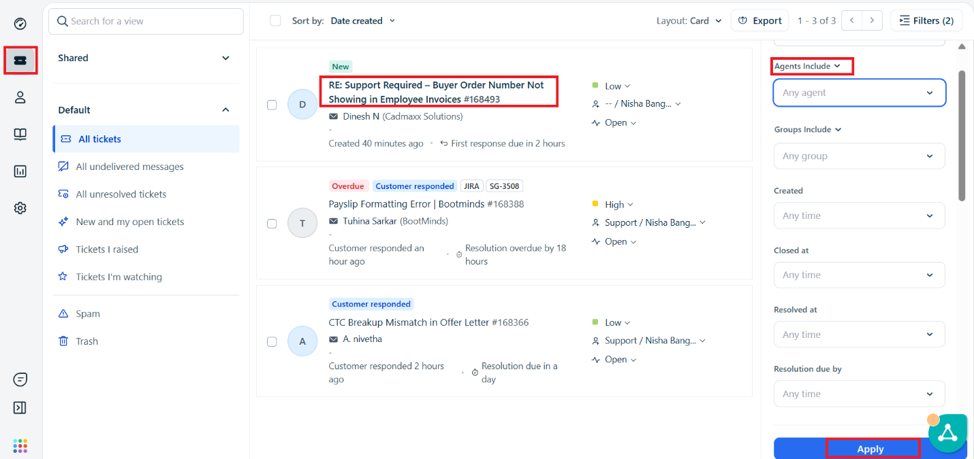
Navigate to the Tickets section, select the required Agent, choose the appropriate Status (Open, Closed, or Unresolved), and click on Apply. Then, open the required ticket to view its details and begin working on it.
2. Working on a Ticket
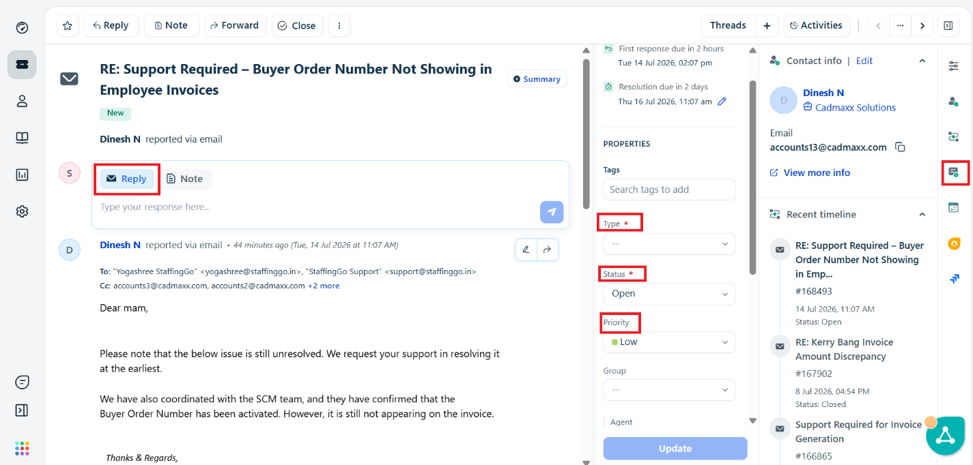
Once the ticket is opened, click on Reply to send a response to the client/customer.
While working on the ticket, update the Properties section with the appropriate details:
Type: Select the appropriate ticket type based on the nature of the request.
Functional: Select this option for functional support-related issues.
App Configuration: Select this option for application configuration requests.
User Training: Select this option when the ticket is related to user training, guidance, or application support for the customer.
Tech – App Bug: Select this option if the issue is identified as an application bug.
Status: Select the appropriate status based on the current progress of the ticket.
Open: The ticket is being worked on.
Pending: Waiting for a response or additional information from the client.
With Dev: Select this status when the issue has been assigned to the Development team for resolution.
Closed: Update the status to Closed once the issue has been resolved.
Priority: Select the appropriate priority (High, Medium, or Low) based on the urgency and impact of the issue.
Group: Select the relevant ticket group.
Development: Select this group if the ticket requires development work or bug fixes.
Implementation: Select this group if the ticket involves implementation or configuration activities.
Support: Select this group if the customer requires assistance, guidance, or functional support.
3. Creating Jira Tickets
If a ticket involves an application bug or requires functional enhancement/support that needs Development team involvement, create a corresponding Jira ticket.
To create a Jira ticket:
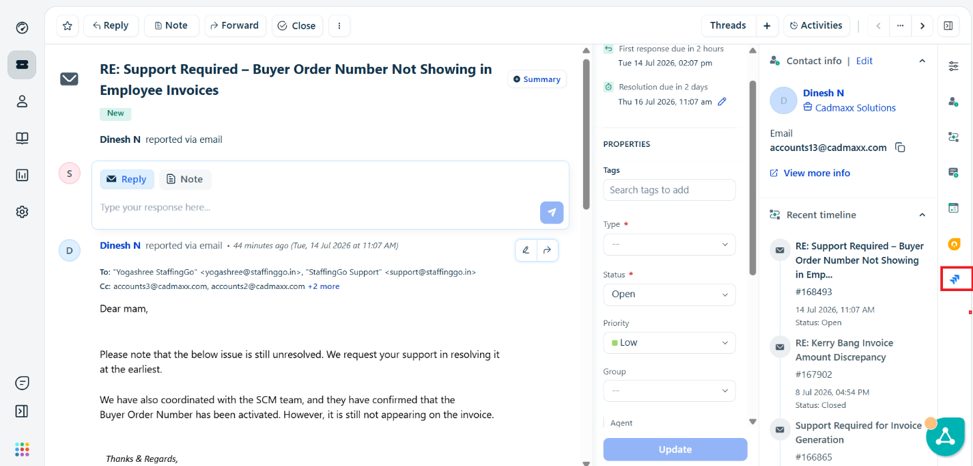
Click on Jira icon available on the ticket to create a new Jira issue.
Enter the required details and create the Jira ticket.
After the Jira ticket is created, record the Jira ticket details in the respective Google Sheet for tracking and reference.
4. Closing a Ticket
Before closing the ticket, update the Properties section with the appropriate details:
Support Level: Select the applicable support level.
Level 1: Select for simple configuration or basic support requests.
Level 2: Select for issues that require moderate effort or technical expertise.
Level 3: Select for complex issues that require advanced technical analysis or resolution.
Support Channel: Select the channel through which support was provided.
Via Email: If support was provided only through email.
Via Email & Phone: If support was provided through both email and phone.
Via Email & WhatsApp: If support was provided through both email and WhatsApp.
Chatbot Response: Update the chatbot response status based on the ticket.
Working: If the chatbot successfully answered the ticket query.
Needs to Improve: If the chatbot response was insufficient and requires improvement.
Not Applicable: If the ticket query is not applicable to the chatbot.
Module Name: Select the module related to the ticket, such as Leave, Attendance, Timesheet, Payroll, Invoice, or any other applicable module.
Time Log: Enter the total time spent working on the ticket and update the time log.
After confirming that the issue has been resolved, update the Status to Closed and save the changes.
Note: While responding to the client/customer, always attach the relevant screenshots, help file(s), and video link(s) (where applicable) to provide complete guidance and facilitate faster issue resolution.
Writing Notes in the Ticket:
When working on a ticket, provide the appropriate response or resolution before closing it. If a meeting, training session, follow-up, or any additional assistance is required, record the details in the Notes section available within the ticket.
(The Notes section is intended for internal communication and is visible only to internal stakeholders.)
Was this article helpful?
That’s Great!
Thank you for your feedback
Sorry! We couldn't be helpful
Thank you for your feedback
Feedback sent
We appreciate your effort and will try to fix the article